Lockout tagout on equipment isn’t just a procedure—it’s a visual language of safety. When you see a physical lock and tag attached to a machine’s energy source, that’s not bureaucracy. It’s a life-saving signal. And more often than not, understanding lockout tagout starts with recognizing what it looks like in the field.
A picture of lockout tagout on equipment tells you more than a policy document ever could. It shows the lock securing a valve, the tag identifying the worker, the chain isolating a circuit. These aren’t abstract concepts. They’re tangible steps that prevent accidental energization, protect maintenance crews, and comply with OSHA standards. Without a clear visual reference, even trained personnel can misinterpret isolation points or assume a machine is safe when it’s not.
This article dives into what a real picture of lockout tagout reveals—down to the placement, labeling, and common oversights that compromise safety. Whether you're a safety manager, maintenance technician, or operations lead, recognizing the right image of LOTO in action is critical.
Why a Picture of Lockout Tagout on Equipment Matters
Visual confirmation is everything in industrial safety. A written LOTO procedure might state, “Isolate the main power disconnect,” but does that mean the circuit breaker? The motor starter? The hydraulic line? A picture removes ambiguity.
When employees see a correctly applied lockout device on a piece of equipment—say, a lock securing the disconnect switch of a conveyor system—it reinforces training. It becomes a mental model for what compliance looks like in their environment.
Real-world scenarios where visual cues prevent accidents: - A maintenance tech sees a lock and tag on a pump control panel and walks away, avoiding startup during servicing. - A new hire learns by example when a supervisor points to a photo showing a padlock on a valve handle with a tag listing the worker’s name and time. - An auditor verifies compliance by comparing site conditions to documented LOTO photos in the safety manual.
Without a reference image, assumptions creep in. And assumptions kill.
What to Look for in a Valid Lockout Tagout Image
Not all pictures of lockout tagout are equal. Some show incomplete or incorrect procedures. A useful image must demonstrate key OSHA-compliant elements:
1. Physical Lock in Place The lock must be applied directly to the energy-isolating device—like a circuit breaker, valve, or switch. A photo showing a lock hanging loosely nearby is misleading. The lock must prevent operation.
2. Legible Tag with Critical Info A tag without information is useless. A valid tag includes: - Employee name - Department or crew - Date and time of lock application - Reason for lockout (e.g., “Motor replacement”) - Contact information
3. Clear Isolation Point The photo should show the exact point of energy isolation. For example: - A locked disconnect switch for electrical systems - A closed and locked ball valve on a pneumatic line - A blocked flywheel on rotating equipment
4. Group Lockout Context (If Applicable) In multi-craft jobs, the image may show a group lockout box with individual locks attached. This illustrates a coordinated shutdown where multiple workers isolate one machine.
5. Real Equipment, Not Illustrations Diagrams help, but a photo of actual equipment in its operating environment—factory floor, maintenance bay, utility room—adds authenticity and reduces confusion.
A strong picture doesn’t just show compliance. It tells a story: This machine is unsafe to operate. Someone is inside, below, or near it. Do not start.
Common Visual Mistakes in Lockout Tagout Photos
Even experienced teams make errors that show up clearly in pictures. Review these common missteps:
1. Locks on Non-Isolating Devices A frequent error: locking the emergency stop button. E-stops aren’t energy-isolating devices. They interrupt control circuits but don’t de-energize the machine. A photo showing a lock on an E-stop button is dangerously misleading.
2. Tags Without Worker Identification Blank or generic tags (“Under Maintenance”) fail OSHA requirements. A compliant photo must show a filled-out tag with a real name.
3. Missing Locks on Secondary Energy Sources Machines often store energy in springs, capacitors, or hydraulic accumulators. A photo showing only an electrical lock but no bleed valve secured means the image is incomplete.
4. Use of Tags Without Locks Tags alone are not acceptable under OSHA 1910.147 unless the employer proves locks are infeasible. A picture showing only a tag on a disconnect switch suggests a weak safety culture.
5. Poor Photo Angles If the lock or tag isn’t clearly visible, the image fails its purpose. Shadows, glare, or distance can obscure critical details.
A safety team should maintain a library of correct and incorrect LOTO photos for training. Side-by-side comparisons sharpen recognition skills fast.
Real-World Examples of Lockout Tagout in Action
Let’s break down three actual scenarios where a picture of lockout tagout made the difference.
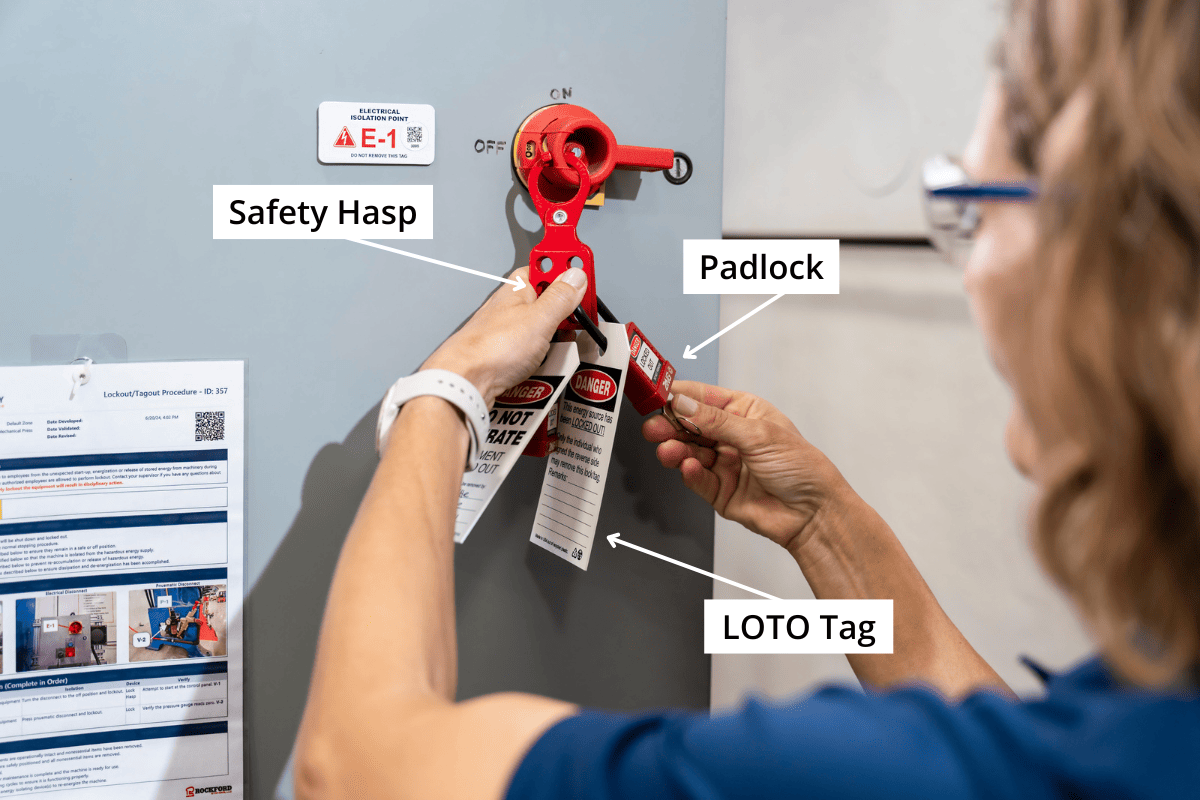
Example 1: Conveyor System Maintenance A technician services a conveyor drive motor. The photo shows: - A hasp installed on the main disconnect switch - Two individual locks applied (mechanic and electrician) - Tags indicating “Drive belt replacement – Jane Doe, Maintenance” - A secondary lock on the air supply valve
The image is used in onboarding to show multi-point isolation.
Example 2: Chemical Pump Isolation During a seal replacement, the pump must be isolated from electrical and fluid sources. The picture captures: - Electrical disconnect locked and tagged - Inlet and outlet valves locked in closed position - Pressure gauge showing zero - Tag with hazard warning: “Toxic residue present. PPE required.”
This photo becomes part of the site-specific LOTO procedure.
Example 3: Failed Lockout – A Cautionary Image A near-miss investigation reveals a photo taken during a machine inspection. The tag is present, but the lock is missing. The disconnect handle is free to move. This image is added to safety bulletins with the note: This is why we verify.
Best Practices for Capturing and Using LOTO Images
Photos aren’t just for audits. They’re training tools, compliance proof, and part of a proactive safety culture.
1. Standardize Your Photo Protocol Create a checklist for taking LOTO photos: - Use consistent lighting and angles - Include a label or sign showing equipment ID - Capture wide shot (context) and close-up (lock/tag detail) - Date-stamp images automatically
2. Integrate into Work Permits Link LOTO photos to digital work permits. When a job is approved, the system requires an uploaded image of the locked-out equipment before work begins.
3. Use in Daily Safety Briefings Start shift meetings with a “LOTO of the Day.” Show a real photo—good or bad—and ask the team to identify issues.
4. Store in Accessible Locations Host images in your EHS software, intranet, or printed near equipment. Field teams should be able to pull up reference photos on tablets or phones.
5. Audit with Visual Evidence During safety audits, require supervisors to submit recent LOTO photos. Compare them to procedure documents. Gaps become immediate training opportunities.
Equipment-Specific Lockout Tagout Visuals
Different machines demand different isolation strategies. A one-size-fits-all photo won’t work.
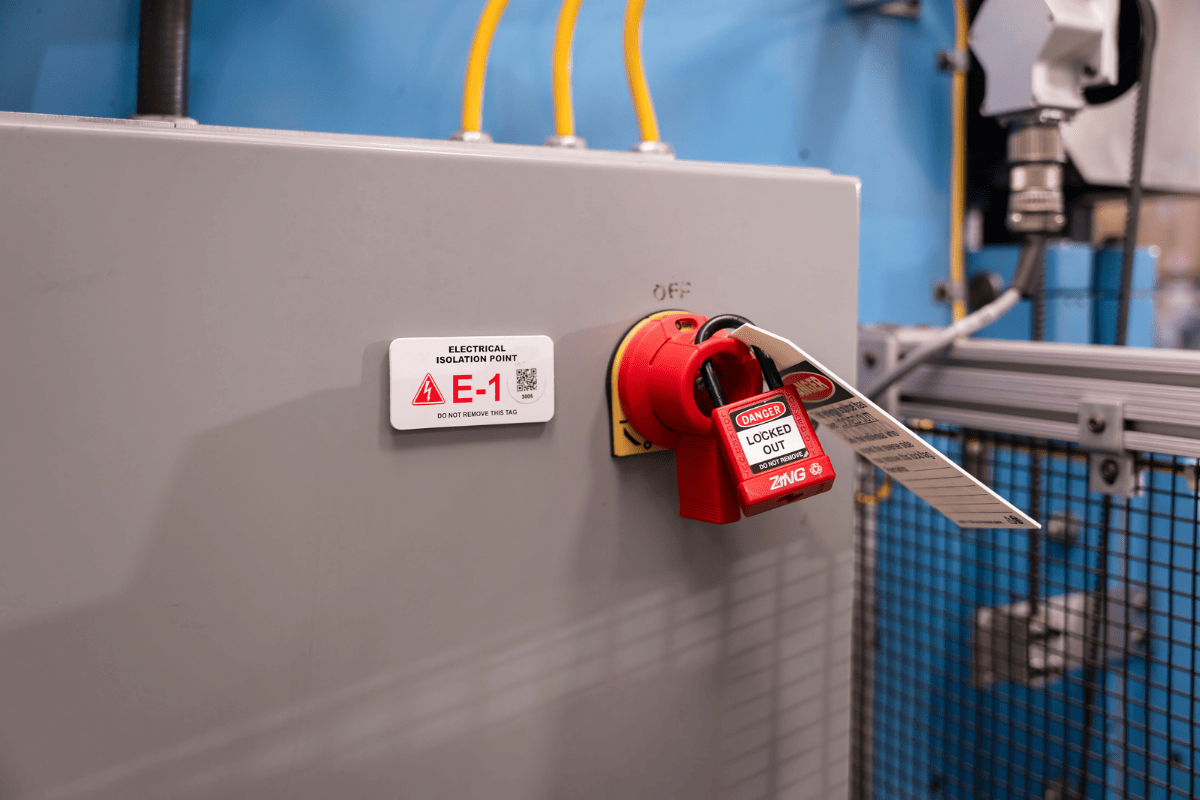
Electrical Panels Photo should show: - Main disconnect switch locked in OFF position - Lock applied via hasp or built-in locking mechanism - Tag with maintenance reason and worker ID - Warning label visible
Hydraulic Systems Key visuals: - Valve locks on supply and return lines - Pressure relief valve open and secured - Lockout applied before any line disconnection
Rotating Equipment (Pumps, Fans, Conveyors) Must show: - Energy source locked out - Mechanical block preventing rotation - Tag detailing work scope
Portable Equipment Often overlooked. A valid photo shows: - Battery removed and locked in storage box - Plug locked in disconnect position - Tag attached to equipment handle
Each type needs its own reference image in the safety library.
Training with Lockout Tagout Images: A Proven Method
The most effective LOTO training programs use real photos—not stock images or cartoons.
How to implement: - Conduct “photo walks” where teams document correct and incorrect LOTO applications - Host monthly “spot the violation” contests using real site photos - Include image-based quizzes in refresher training - Use augmented reality (AR) apps that overlay correct LOTO visuals on real equipment
One manufacturing plant reduced LOTO violations by 68% within six months simply by replacing text-based manuals with annotated photo guides.
Visual learning sticks. A technician may forget a ten-step procedure but will remember the image of a coworker’s lock on a steam valve.
Closing: Turn Images into Safety Action
A picture of lockout tagout on equipment is more than documentation—it’s a frontline defense. It confirms isolation, communicates risk, and enforces accountability. But only if it’s accurate, detailed, and used consistently.
Don’t settle for vague or generic images. Capture real moments from your site. Train with them. Audit against them. Make them part of your safety DNA.
Next time you see a lock and tag on a machine, take a photo. Review it. Ask: Does this clearly show the machine is unsafe to operate? If not, improve it. Because in the split second before a startup, that image could be the difference between safety and catastrophe.
Take action today: Audit your current LOTO photo references. Replace outdated or unclear images with real, site-specific examples. Share them in your next safety meeting. Turn visibility into protection.
FAQ
What does a proper lockout tagout picture show? A proper image shows a physical lock applied to an energy-isolating device, a filled-out tag with worker details, and clear context of the equipment being serviced.
Can a tag alone be used instead of a lock? Only if a lock is not feasible, and the facility has a documented alternative protection plan per OSHA 1910.147(c)(3).
Why are photos important for LOTO compliance? Photos provide visual proof of compliance, support training, reduce ambiguity, and help identify procedural gaps during audits.
Should LOTO photos include multiple angles? Yes—include a wide shot for context and a close-up to clearly show the lock, tag, and isolation point.
Who is responsible for taking LOTO photos? Supervisors, safety officers, or authorized employees typically capture and verify LOTO images, especially for high-risk or complex jobs.
Can digital tags replace physical ones in photos? No—OSHA requires a physical tag attached to the lockout device. Digital records support but don’t replace physical tags.
How often should LOTO reference photos be updated? Update whenever equipment changes, procedures are revised, or new hazards are identified—ideally during annual safety reviews.
FAQ
What should you look for in Understanding Lockout Tagout on Equipment Through Real Images? Focus on relevance, practical value, and how well the solution matches real user intent.
Is Understanding Lockout Tagout on Equipment Through Real Images suitable for beginners? That depends on the workflow, but a clear step-by-step approach usually makes it easier to start.
How do you compare options around Understanding Lockout Tagout on Equipment Through Real Images? Compare features, trust signals, limitations, pricing, and ease of implementation.
What mistakes should you avoid? Avoid generic choices, weak validation, and decisions based only on marketing claims.
What is the next best step? Shortlist the most relevant options, validate them quickly, and refine from real-world results.